I want to share to you how to make a customize Open VPN with custom splash and installer itself. I put Everything you need here.
OpenVPN is a full-featured SSL VPN which implements OSI layer 2 or 3
secure network extension using the industry standard SSL/TLS protocol,
supports flexible client authentication methods based on certificates,
smart cards, and/or username/password credentials, and allows user or
group-specific access control policies using firewall rules applied to
the VPN virtual interface. OpenVPN is not a web application proxy and
does not operate through a web browser. OpenVPN 2.0 expands on the capabilities of OpenVPN 1.x by offering a scalable client/server mode, allowing multiple clients to connect to a single OpenVPN server process over a single TCP or UDP port. This document provides step-by-step instructions for configuring an OpenVPN 2.0 client/server VPN, including:
2.After installing OPENVPN Install the NSIS+plugins located on customize openvpn SS
folder.
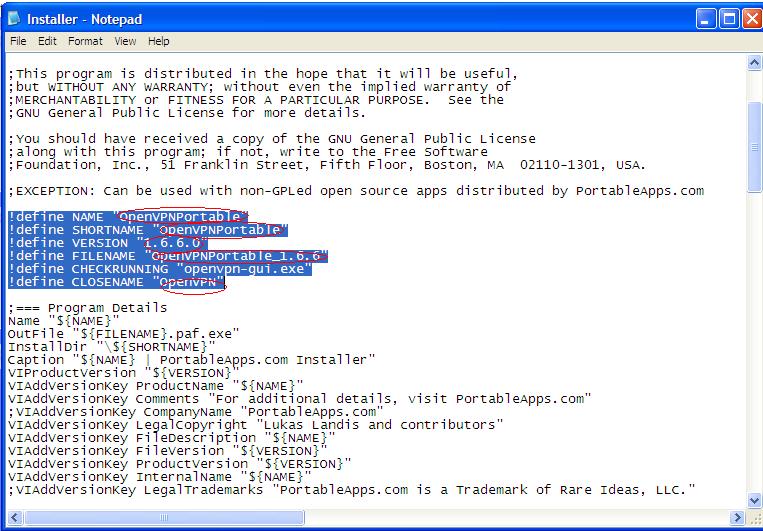
3.OPEN the folder OpenVPNPortableSF here you can find editable
file. You can make or search on Google for ICON format. Make sure you
have the same NAME including the script or else there will be an error
on compiler.
This Tutorial enables you to share you "HotSpotShield VPN Malware Protection"
As we know only Tap32 Adapter Shows only in Network Connection.If you go to CMD type "ipconfig/all" you can view the Anchorfree HSS Adapter but hidden on Network Connection so this the problem why you cannot share your secured vpn network
To share this hidden VPN we must unhide this Ghost adapter
How to do that?
We Remove the Tap adapter and Reinstall it with new modified driver that change the "Characteristic Value"
From 89 to 81 like the character Value of Local Area Network Adapter
Method 1
This the OemWin2k file at the driver open it with a notepad or wordpad
etting up the Vista Point-to-Point
Tunneling Protocol (PPTP)
Virtual Private Network (VPN)
Server
This Mini-How-To was created as
an example of
one way to remotely access a home office network
using a
Point-to-Point Tunneling Protocol (PPTP) Virtual Private Network (VPN) connection over the public
internet using technologies built-in to the Vista operating system. Configurations are based on remote
user access to this
example
local area network. Note the setup and configuration
procedure should be run while logged on as a user with Administrator
privileges.
This procedure
applies to the following
versions of Vista: Home Basic, Home Premium, Business, Enterprise,
Ultimate.
Setup the Vista PPTP VPN Server (Screen shots are from a Vista
Ultimate desktop PC)
Logon the Vista PC as a user with Administrator
privileges. The Vista VPN Server is configured by navigating to Start | Control Panel |
Network and Internet | Network and Sharing Center
and selecting Manage network connections.
Select File | New Incoming Connectionfrom
the drop down menu. If the Menu bar is not visible press the <Alt>
key on the keyboard to toggle it on.
Select user's that will be allowed to login to the
PPTP VPN server
through the VPN connection. Click Next. In the example shown a special standard user account protected by a
strong password that is only used for remote VPN access is selected.
Click on Add someone... to add the special user account.
Select the Through the Internet check
box then click on Next.
Select Internet Protocol Version 4 (TCP/IPv4)
and then click on Properties.
If remote VPN users will be allowed to
access the home local area network check the Allow callers to access my local
area network checkbox. Configure the IP address assignment window using IP
addresses in the same subnet as the VPN server PC and LAN (see the
example
local area network). In the following example the From: address is the address
assigned to the VPN gateway and the To: address
is assigned to the incoming VPN client. Click OK when finished. Note that
by design Vista will only accept one incoming VPN connection at a time.
Click on Close.
When finished the Network Connections window
will indicate the new Incoming Connections icon.
Configure the Network Firewall/NAT Router for PPTP VPN access
If the Vista PPTP VPN server PC is behind a broadband router,
the router must be configured
to allow PPTP VPN access. Both TCP Port 1723 and
GRE
Protocol 47 are used to pass PPTP VPN traffic through the firewall. Some
router manufacturers call enabling GRE Protocol 47 traffic PPTP Pass Through or VPN Pass Through.
Check the users manual for your specific router for details. The example screen
shots are from a Network Everywhere NR041 4-Port Broadband Router. See
the
example
local area network.
The Vista Windows Firewall will be automatically configured
to allow PPTP VPN access. GRE Protocol 47 traffic is automatically enabled
through the Windows Firewall when TCP Port 1723 is opened.
Configure the Vista PPTP VPN client and a client lmhosts file
The Vista PPTP VPN client can be configured using
the procedure detailed on the online
Vista Help and Support site.
An lmhosts file that maps computer names to
LAN IP addresses on the remote network may be created in the
C:\Windows\system32\drivers\etc folder on the VPN client computer. The
client can then use the form \\ComputerName\ShareName to access shared
folders on the remote network. See this
Microsoft article for file syntax help. An example lmhosts file can be
downloaded here.
The example lmhosts file is based on remote user access to this
example
local area network.
Enhance client to server security
WARNING:
The following are recommendations for Small Office/Home Office (SoHo) users
connecting to a standalone Vista host computer with the Vista PPTP VPN client
software only. Users connecting to remote computers in a corporate or domain
environment should check with their network administrators for configuration
guidance.
Client configuration
Client users are encouraged to use a
strong password when logging onto
a remote PC with a PPTP VPN connection. The
client user can configure these properties by
navigating to Start | Control Panel | Network and Internet | Network and
Sharing Centerand selecting Manage network connections.
Right-click the VPN
connection that you want to edit then click Properties.
Server configuration
The Vista PPTP VPN server
computer administrator can configure these properties
by navigating to Start | Control Panel | Network and Internet | Network and
Sharing Centerand selecting Manage network connections.
Right-click the Incoming Connections
icon then click Properties. Check the Require all users to secure their
passwords and data checkbox.
Troubleshooting the PPTP VPN server - client data link
The Vista PPTP VPN server to client link can be
tested using the detailed test procedure in the PPTP Ping and VPN
Traffic sections of the
Testing Network Paths for Common Types of Traffic article by the Cable Guy.
The pptpsrv.exe and pptpclnt.exe programs on the XP SP2 CD may be
used. To extract the programs on a Vista PC insert the CD in the CD drive and
select Open folder to view files from the AutoPlay window.
Select the Support folder.
Select the Tools folder.
Select the Support cabinet file.
Highlight the pptpsrv.exe and pptpclnt.exe
files then right-click the mouse button and select Extract from the menu
window.
Save the files to a temporary folder. Click on X
in the upper right corner of the window to close and eject the CD from the CD
drive. Copy the pptpsrv.exe file to the server PC and the pptpclnt.exe file to a
client PC and run the test procedure as detailedin the
VPN Traffic section of the
Testing Network Paths for Common Types of Traffic article by the Cable Guy.
How to create the VPN server interface, step-by-step
1. Click Start | Control Panel.
2. In the Control Panel, open the Network Connections applet.
3. In the Network Connections window (see Figure A), open the New Connection Wizard.
Figure A The Network Connections window
4. On the Welcome To The New Connection Wizard page, click Next.
5. On the Network Connection Type page (see Figure B), select the Set Up An Advanced Connection option.
Figure B
On the Advanced Connection Options page (see Figure C), select the Accept Incoming Connections option and click Next.
Figure C Configuring XP to accept incoming connections
7. On the Devices For Incoming Connections page (see Figure D), you
can select optional devices on which you want to accept incoming
connections.
Figure D Note that you are not presented with any of the network interfaces on the computer.
8. On the Incoming Virtual Private Network (VPN) Connection page (see Figure E), select the Allow Virtual Private Connections option and click Next.
Figure E
9. On the User Permissions page (see Figure F), select the users that are allowed to make incoming VPN connections. Click Next.
Figure F Any user that isn't selected won't be able to initiate an incoming connection.
10. On the Networking Software page (see Figure G), click on the Internet Protocol (TCP/IP) entry and click the Properties button.
Figure G Configuring TCP/IP properties
11. In the Incoming TCP/IP Properties dialog box (see Figure H),
place a check mark in the Allow Callers To Access My Local Area Network
check box. This will allow VPN callers to connect to other computers on
the LAN. If this check box isn't selected, VPN callers will only be
able to connect to resources on the Windows XP VPN server itself. Click
OK to return to the Networking Software page and then click Next.
Figure H Granting LAN access to callers
12. On the Completing The New Connection Wizard page, click Finish to create the connection.
After the Incoming Connection is complete, right-click on the
connection in the Network Connections window and select the Properties
command (see Figure I).
Figure I Accessing the properties of the VPN server link
Note that on the General tab of the Incoming Connections Properties page (see Figure J) that no devices are listed. The comment No Hardware Capable Of Accepting Calls Is Installed isn't true, since you can now create VPN connections to both network interface cards. In practice, there is no point in creating a VPN connection to the internal interface card.
Figure J VPN clients will only call the external IP address of the Windows XP Professional VPN server.
VPN server optimization tips
The New Connection Wizard made it easy to create the VPN server
interface, but you can still do more to optimize your VPN connections.
First, note that you can create PPTP or L2TP/IPSec VPN connections. Figure K
shows the connection status dialog box of a Windows XP VPN client
connected to a Windows XP VPN server. Note that MPPE 128-bit encryption
is automatically enabled and that Microsoft CHAP v2 is used for
authentication.
Figure K If both machines had machine certificates from the same
Certification Authority installed, an L2TP/IPSec VPN link could have
been negotiated.
If you want the VPN client to access resources on the internal
network, the IP address assigned to the VPN client should be on the same
network ID as the internal interface of the Windows XP VPN server
computer. In addition, all the machines on the internal network should
have a default gateway set using the IP address of the internal
interface of the Windows XP VPN server.
In the unlikely event that the SOHO has multiple network segments,
the routing table on the Windows XP VPN server needs to be configured
with paths to the various internal network IDs. You can use the ROUTE
ADD command to create these routing table entries.
Small networks that use a Windows XP Professional machine for a VPN
server probably won't have network services such as WINS or DNS. If name
resolution on the private network is an issue for the VPN client, then
you should create a LMHOSTS file, a simple text file that contains name
and IP address mappings. For example, the following line could represent
an entry in an LMHOSTS file: 10.0.0.2 DEFIANT
The VPN client must be configured with an IP address or host name for
the Windows XP Professional VPN server. If the Windows XP Professional
client has a dedicated link to the Internet and a static IP address, you
can use that IP address in the VPN client configuration interface.
However, if the Windows XP Professional VPN server is assigned an IP
address via DHCP, you'll have to use an Internet host name and a method
of registering the host name dynamically. A couple of services you might
want to look into are TZO and DYNDNS. Both of these services will let you dynamically register a computer's IP address into the public DNS database. Conclusion
Windows XP Professional provides simple VPN server capabilities that let
you connect single VPN clients to your internal network, one at a time.
If the Windows XP Professional computer has a dedicated connection to
the Internet, you can connect to that computer from virtually anywhere
in the world using a VPN link. The VPN server setup is simple and can
accept calls from any Windows PPTP or L2TP/IPSec client.
Nasa STEP 2 po ung download link. mas maganda kung idownload nyo itong
bago kasi mas bago, kasi ung luma eh luma na nyahahaha ....Apir!
Wala ng paliguy-ligoy pa (HINDI CHOOSY, NO ACCOUNT
NEEDED, NO REGISTRATION NEEDED, NO LIMIT, NO RESTRICTION, NO
PM-PM(private message), NO FORCE OF WEARING SIGGY, NO NEED TO JOIN ANY
FORUM/GROUP SITE, GAWIN MO KUNG ANONG GUSTO MONG GAWIN BAHALA KNA MALAKI
KNA AT HIGIT SA LAHAT WALA PONG BAYAD!! AT PWEDE DIN PANG ONLINE GAMES
!!!
Tandaan: drwang12 idolo ko at kasama ko sa mga freevpn mangolekta tol inilabas ko na sya pero ung iba hindi ko ilalabas hehe EXPAT
SHIELD (EXS) UK IP ONLY kapatid ni Hotspot Shield (HSS), unlimited at
no limits din pero hindi ganun kababa ng ping nya tulad ni HSS pero
humahataw din ito
Sa mga HSS users na dyan alam nyo na gagawin nyo kahit di nyo na basahin
ung tutorial ko download nyo na lang agad ung openvpn portable para
lang toh sa mga 1st time na gagamit, pwede ring ung config na lang
idownload nyo tapos isama nyo sa HSS na openvpn portable pero kung gusto
nyo ng may kasamang icon mismo ng Expat Shield download nyo nadin sa
baba ung openvpn portable na ginawa ko para sa Expat Shield.
0.*using globe sim w/ 0 balance, (for udp)APN: http.globe.com.ph (for tcp)www.globe.com.ph, (for udp)Access number: *99# (for tcp)*99***1#, Authentication Protocol Settings: PAP
*using smart sim w/ at least 2php balance(not smart bro sim), APN: internet, Access Number: *99#, Authentication Protocol Settings: PAP or CHAP (note 1: para sa profile name ng SMART/GLOBE ilagay nyo kahit ano gusto nyo)
(note 2: Want NO EXPIRY load sa SMART? Txt WALLET to 7532 to activate ur
LOADWALLET 4 FREE at least 2php kapag nagregister ka magiging NO EXPIRY
na ang load mo) 1.Download TAP-HSS Adapter 32bit.rar or TAP-HSS Adapter 64bit.rar extract it, execute "addtap_hss_adapter", wait nyo lang hanggang maging successful. (note 1: kung dating HSS user ka na hindi mo na need maginstall ulit ng TAP-HSS Adapter.)
(note 2: TAP-HSS Adapter is important in order to make EXS work in
openvpn application, TAP-HSS Adapter is different from TAP-Win32 Adapter
of openvpn application)
(note 3: if you are using windows vista/7 right click run as adim or
right click then properties and change compatibility mode into XP mode)
(note 4: Expat Shield error tap Solution for 64bit-users check the links below, or Read FAQs) Kimm321's post http://symbianize.com/showpost.php?p...postcount=2606 EvilMee's post http://symbianize.com/showpost.php?p...ostcount=15343
Or para sa mga nagkakaerror or nahihirapang ma-install ang "addtap_hss_adapter" idownload nyo na lang itong LAST OPTION EXS.txt at ito ang sundin nyo then proceed na kayo sa STEP 2 sa baba. 2.Download this also and extract it(after
u've finished downloading this, it is important to disconnect from the
internet), double click Expat Shield(.exe) if prompt for "Install
required virtual blah blah" click YES, connect from the internet now,
then connect hotspot shield too, wait until you get connected, BROWSE
and ENJOY! Expat Shield powered by Portable Openvpn 2.1 (GLOBE-SMART UDP) SEPT 16, 2011.rar (NEW 28 Configs FOR GLOBE/SMART UDP w/ auto-fingering combined auto-flushdns) Expat Shield powered by Portable Openvpn 2.1 (GLOBE-SMART UDP) AUG 28, 2011.rar (FOR GLOBE/SMART UDP w/ auto-fingering combined auto-flushdns) (note: hindi gagana ang latest version ng openvpn dito
at wag nyo ng galawin ung mga files dahil may ginawa ako dyan baka
lalong hindi gumana hehe)
(Basic tutorial on how to use a pinger with cmd) http://www.symbianize.com/showpost.p...postcount=3008 3.para sa manual configs ng 13 servers download nyo na lang sa baba, salamat kay sir Kimrashid for the new SMART TCP config 13 servers config GLOBE_UDP-8-8-2011 13 servers config SMART_TCP-8-8-2011
Reminder 1: kapag connected kayo pero No browse mag flushdns lang kayo
Ganito gawin nyo pag connected pero no browse. download nyo lang ung file na ito tapos irun nyo lang yung "FLUSHDNS.bat" tapos try nyo ulit mag browse disconnect-reconnect broadband >
disconnect-reconnect Hotspot Shield(.exe) > run nyo ung FLUSHDNS.bat
> try to browse again o kaya disconnect-reconnect dashboard> tapos run muna si
FLUSHDNS.bat > tapos reconnect si Hotspot Shield(.exe) > try to
browse again Reminder 2: pandagdag kaalaman kung nakakaranas kayo ng palaging na ddc ty nyong gumamit ng PINGER, download nyo lang itong "PINGER.bat" extract lang tapos irun nyo lang. Reminder 3: use Adblock to prevent Ads for better browsing
For chrome https://chrome.google.com/webstore/d...amgkkbiglidom#
For Firefox https://addons.mozilla.org/en-US/fir.../adblock-plus/
For Internet Explorer version IE7, IE8 and IE9 http://simple-adblock.com/
For Safari http://safariadblock.com/
For Opera https://addons.opera.com/addons/exte...-adblock/0.46/
Some FAQs Why do I see ads?
~Expat Shield is a free, ad-supported product. In order to provide users
with a free service, we show advertisement from our partners. Once you
disconnect from Expat Shield, you will no longer see advertisement from
our partners.
Does Expat Shield have bandwidth limit?
~No. You can use Expat Shield as much as you would like.
Bakit po mabagal ang HSS (or ibang vpn)?
~mga possible reason kung bakit minsan mabagal ang VPN dito sa pinas.
1. ang ISP(globe/smart) po naten e sadyang hindi makapagbigay ng stable
na connection minsan mabagal minsan mabilis at yan ang nakakainis sa
kanila buti na lang free user lang tayo
2. dumepende po ang mga VPN sa bilis ng ISP naten. kung mabagal internet connection mo natural mabagal din ang VPN mo.
3. Area or location .... meron mga area talaga na mabilis sa kanila ang
Globe or Smart at meron naman mga area na mabagal talga sa kanila ang
Globe or Smart.
4. consider nadin naten na malaking bagay din ang signal lalo na sa mga
USB modem like Globe tattoo kit or SmartBro Kit dahil isa pa dyan e
wireless lang ang mga kit naten, kung mas malakas ang signal mo natural
mas maganda ang connection mo pero syempre depende padin yan sa location
mo at ISP na gamet mo. ganun din syempre sa signal kung pangit naman
ang signal mo natural e di pangit din
"Cannot resolve host address: ....[NO_DATA] The requested name is valid
....'--script-security 2' or higher to call user-defined scripts or executablesbut does not have an IP address."?
~posiible reason sa nagkaka error ng cannot resolve e dahil sa isp yan.
- pwedeng di mo na-konek ang modem (solution bunutin ang modem tapos ipasok mo ulit para maka sigurado)
- your client ip address is having too much request timeout (means reconnect your dashboard lang)
- wrong apn used (check mo mabuti sa dashboard kung tama nga ba)
- signal dropping (mas maganda kung malakas ang signal)
- other vpn running (check mo baka hindi mo pa nadisconnect or na close ang ibang vpn tapos kumokonek kana agad sa bagong vpn)
- need to flush dns in cache or restart your pc para fresh connection (minsan effective din ito)
ERROR: netsh command failed: returned error code 1
NETSH: C:\WINDOWS\system32\netsh.exe interface ip set address...
~Solution 1
Reinstall "addtap_hss_adapter" TAP-HSS Adapter 32bit.rar or TAP-HSS Adapter 64bit.rar extract it, run removetap_hss_adapter to remove TAP-HSS Adapter from your system then run addtap_hss_adapter to install TAP-HSS Adapter again. This should fix NETSH error. If not try the solution 2 below.
~Solution 2, gio here: http://symbianize.com/showpost.php?p...&postcount=441
INSTALL the original Anchore FREE if You can't install Tap32 Manualy
click Here




 Posts
Posts


