Featured Post Today
print this page
Latest Post
Showing posts with label How to Fix. Show all posts

DOWNLOAD ANTI DEEPFREEZE

Deep Freeze is a good program if you want to keep your system secure, but it can be a real pain if YOUR FORGOT you’re no longer using it and want it off your system. Before you can uninstall Deep Freeze, you have to disable it. To disable it, you’ll need the password. If you want Deep Freeze gone for good, follow this guide to remove it with or without the password


There is no uninstall file for Deep Freeze. Instead, you will need to run the file that installed the program to begin with. If you no longer have the installation file, you can download it again from the Deep Freeze website.

    The file for Deep Freeze 5 is typically: DF5Std.exe
    The file for Deep Freeze 6 is typically: DF6Std.exe
    The file for Deep Freeze 5 is typically: DF7Std.exe
 
TURN OFF YOUR ANTIVIRUS WHEN USING THIS TOOLS

GOOGLE DRIVE


4SHARED LINK


0 comments
Posted by: Jaime
blognizend, Updated at: 10:48 AM

NBA 2K12 Sound Fix – No sound or weak sound

Problem #8 NBA 2K12 Sound Fix – No sound or weak sound

There is a built in Direct X on  NBA2K12 you must install for COmputech like me we don't install the games we just copy it.


For Windows 7 and Vista users:

First of all, update your sound card drivers. If doing that doesn’t clear up the problem, make sure you have volume set to max for NBA 2K12 in the volume mixer (click on the little speaker icon in the bottom-right of your screen in the system tray). If you’re in-game, just alt+tab out of the game and check if NBA2K12 is set to max in the volume mixer.
Another tip you could try is to go to Control Panel > Hardware and Sound > Sound > Communications Tab then select the ‘Do Nothing’ radio button to permanently fix this issue.


READ MORE where to Download the FIX Direct X
0 comments
Posted by: Jaime
blognizend, Updated at: 6:02 AM

How to Fix Laptop (Basic)

Is your laptop didn't Boot Up!NO Screen? I teach you how to fix it before you call a expensive Tech guy.
Common problem of laptops when you switch it on LED light turns on, but "no screen"  or LED lights ON then turn OFF.


 Tutorial by Blogmytuts 101:


READ MORE .....


0 comments
Posted by: Jaime
blognizend, Updated at: 11:12 PM

Built in WebCam Problem Solve


I have a problem on built webcam after upgrading the old Windows to Windows7. The Webcam is "Not Detected Hardware" or Uninstalled. As we know Windows 7 has all drivers and it can auto update any driver available.

Most Laptop with this trouble are:

  • Asus
  • Acer
  • Samsung
  • Neo
As you see no Webcam is detected except for "Base System Device " (system device PCI or Card reader)
Device Manager....


On Device and Printers..

Like a built in WiFi device , built in WebCam need a hardware enabling device. The default  key is Fn + F10 ,after pressing  these key you will notice your webcam "Lights On" or Try any Fn+ combo key F1 to F12 


NOTE: Look for Product Manual on How to Enable WebCam . Now its working vice Manager and Device and Printers.


 Testing the WebCam you can download Vimicro USB Camera . Its allow you to take capture photo and videos.


0 comments
Posted by: Jaime
blognizend, Updated at: 3:21 AM

CD-R KING CW-8196 Wifi Setup for GLOBE WIMAX

 CC Series P880.00php Only

1.Plug your router access 192.168.10.1 on web browser log in as admin:admin


2.Click Setup

3. Click your Wifi and config all the circles.
SSID = WiFi Name
Security = its up to you.. (for me I choose TKIP )
PassPhrase = Your WiFi Password
 4. For Connected but No " Internet Access".Try this.. COPY all the config

For some reason WiFi client are connected but no internet  access I manually put GOOGLE DNS  works fine for BM622i WIMAX.


0 comments
Posted by: Jaime
blognizend, Updated at: 1:13 AM

Customize Antenna for Wimax

How to make Wimax Antenna or Pigtail for old Wimax

1.You need a 1 ft TV antenna. (if you have a Wimax antenna/ No Wimax no need to cut just skin it off)


2. Skin it 2 inches and a half centimeter for the middle wire


3. Attach the end in your Wimax Antenna put a Brace and tie it up :P (Much better you have a BM662i antenna , marami nyan sa suking kapitbahay na disconnected because Service Provider need only the Modem) NO need to do this for Antenna TV


4.Now plug you antenna and look the signal 3 bar!!
Before

Speed Test


After


Speed Test


0 comments
Posted by: Jaime
blognizend, Updated at: 2:32 AM

Restore Windows 7 Icons and open with


Did you accidentally change the option or setting when you trying to open a files?


Then after selecting open with your file turn something like this.. Same Icon
How to fix?
1.Download these two files.
lnk_fix_w7
Rebuild_Icon_Cache

2.After downloading the 2 files Open Task Manager by Pressing  Ctrl+Shift+Esc.Go to Process" End Process" explorer.exe


3. Click File tab then click New Run-Browse click all files open lnk fix 7
You must know where did you place you downloaded files.


4. Same as step 3  New task then find Rebuilt_Icon_Cacher then Restart.it will ask you y/n  type Y


Finish!!  all back to default


0 comments
Posted by: Jaime
blognizend, Updated at: 9:40 PM

Make Your Windows Faster

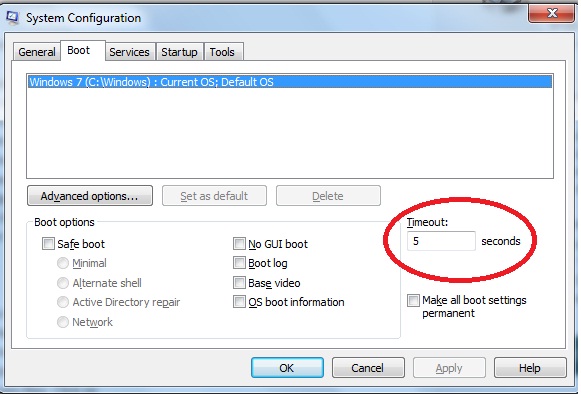
1. Run "msconfig"
2.By default, it's 30, which means 30 seconds of wait time before boot. This can be changed, make it 3 seconds. (Note: if you have more than one operating system, this means the wait time to startup to the highlighted Operating System. Sometimes you might want a bit more than 3 seconds than you can opt 5 or 10 seconds). Apply and click Ok.


0 comments
Posted by: Jaime
blognizend, Updated at: 3:30 AM

Unhide Folder cause by Virus

1. open windows command prompt.

2. then type your flash disk directory in win command prompt, for e.g.: E: then enter.

3. after that, type attrib -s -h /s /d then press enter.

4. after this process all of your folders and files will come back.


0 comments
Posted by: Jaime
blognizend, Updated at: 3:23 AM

How to Test A Desktop Power Supply

I show you how to Test a Power supply if is working or not..

A power supply looks like this..


and here were to test it..


  You Need a Pin or  a a piece of wire


 Now Plug the Power Supply

 Used a wire  to Jumper the GREEN "PS On" to a Black ( Com)one..
If the Power Supply FAN is ON  You have a working Power Supply. You can actually  run your DVD rom and play a song :p


1 comments
Posted by: Jaime
blognizend, Updated at: 2:12 AM

How to Disabled Windows UAC "User Account Control Settings"


Maybe you was annoyed on Windows UAC,cuz every time you install something. It Pop-up and asking "Do you want...?". Even you Run it in Admin user. How to Disable it?

(On Windows 7 Vista : Premium, Ultimate Only )

Click Start find something like this.."Getting Started"


You you see the UACand you can change the setting that you want..


0 comments
Posted by: Jaime
blognizend, Updated at: 1:54 AM

How to Setup Digitel Prolink H5201

Digitel has a new modem H5201, my friend modem with this modem. The problem is the modem can't share the internet in other computer in his shop. After 2 weeks the Digitel Technician came. So they fix it and try it to one PC and it works ,but when they try to share it with other unit via a router they don't know how to share it!.
So I came to help my friend.

1.Plug your modem in your PC

I open the pro link interface..
user:user
password:user


This one is not connecting sting handshaking..  No Server.
This one is Connected
 The router has a fixed IP so  no need to change it..

I did some change in these

DNS
202.138.128.50
202.138.128.54

124.217.127.234
124.217.127.238

Next click Apply


Before anything else try to browse and if go to RUN type CMD and type " ipconfig/all"
Get your MAC we need it lately for mac clone..


Now the router setting
EDIMAX
user: admin
password:1234

Go to LAN change IP 192.168.2.1 or any  the importa is NOT similar to 192.168.1.1 because that is Prolinks IP if the IP is same it will be IP conflict
Next  Mac Clone.


Now save reboot your modem , router and PC..

Now your IP must look like this..


Finish...

hostgator coupon page
0 comments
Posted by: Jaime
blognizend, Updated at: 10:48 AM

How to Put AdBrite ads with no Errors

 You might have a trouble like this one..


1. Go to Dashboard > Design > Edit HTML > Expand Widget Template and look for
<div class='post-body entry-content'>

2. Get Adbrite ads code and paste to Notepad. In Notepad press 'CTRL' + 'H'.
Replace
< with &lt;
and
> with &gt;

Also replace ” with &quot;

3. Now add this code below <div class='post-body entry-content'>
Save template.


Your code should be like this
width="300"><!-- Begin: adBrite, Generated: 2012-03-14 3:53:16  -->
&lt;script type="text/javascript">
var AdBrite_Title_Color = 'E1771E';
var AdBrite_Text_Color = 'FFFFFF';
var AdBrite_Background_Color = '333333';
var AdBrite_Border_Color = 'CCCCCC';
var AdBrite_URL_Color = '008000';
try{var AdBrite_Iframe=window.top!=window.self?2:1;var AdBrite_Referrer=document.referrer==''?document.location:document.referrer;AdBrite_Referrer=encodeURIComponent(AdBrite_Referrer);}catch(e){var AdBrite_Iframe='';var AdBrite_Referrer='';}
&lt;/script&gt;
&lt;script src="http://ads.adbrite.com/mb/text_group.php?sid=2117253&amp;zs=3330305f323530" type="text/javascript"&gt;&lt;/script&gt;
<div><a target="_top" href="http://www.adbrite.com/mb/commerce/purchase_form.php?opid=303771&amp;afsid=1" style="font-weight:bold;font-family:Arial;font-size:13px;">Your Ad Here</a></div>
<!-- End: adBrite -->


Another way is to create a HTML gadgets  and paste your Code

     Require sites to have a top-level domain and no longer accept sites that use free blog hosting solutions like Blogspot, Hpage, Tumblr, .tk, or .co.cc.  If you would like to use adBrite please use a paid service that provides a top-level domain.
hostgator coupon page
1 comments
Posted by: Jaime
blognizend, Updated at: 2:32 AM

Author rel="me" Error


I got a problem dealing with snippets tools..not working..img from google webmaster profile button


 So I need to remove it. and change it


0 comments
Posted by: Jaime
blognizend, Updated at: 5:30 AM

How To Enable Stereo Mix in Windows7 to record Audio

Ever need to record something on your computer exactly as it comes out of your speakers?  Enabling “Stereo Mix” will let you do exactly that, and here’s how to do it.

Nowadays, most sound cards have the ability to record whatever is being output.  The only hang-up is accessing that recording channel, which can be done rather easily.
Enable Stereo Mix

Go down to the audio icon in your system tray, right-click it, and go to “Recording Devices” to open up the proper settings pane.


In the pane, right-click on a blank area, and make sure both “View Disabled Devices” and “View Disconnected Devices” options are checked.  You should see a “Stereo Mix” option appear.

Right-click on “Stereo Mix” and click “Enable” to be able to use it.

 I Still Don’t See It…

In some cases, your audio chipset drivers aren’t helping your cause.  Most likely, this is because they’re outdated.  In other instances, however, it’s because the newest Windows 7 drivers don’t support this feature.  This was the case on my Asus Eee PC (a 1000HE), but I got around the issue by downloading and installing the older Windows XP/Vista drivers for my audio chipset.  As always, before changing your drivers, make sure create a system restore point in case things don’t go as planned.

How Do I Use This?

With “Stereo Mix” enabled, you can open up your favorite recording program and select that instead of your microphone before you record.  If you don’t see the option, or your program doesn’t give you the ability to change the recording device, you can disable or unplug your microphone and make “Stereo Mix” the default recording device.


This works well for when you want to capture audio for a screen-sharing session, or record audio from streaming sources – such as live web-casts – that don’t necessarily allow you to download content immediately.  In order to do that, you’d open up your audio-recording application of choice (like Audacity), be sure other recording devices are muted or disabled, and click record.  Be sure to check out their article, to learn how to use Audacity.


0 comments
Posted by: Jaime
blognizend, Updated at: 4:40 AM
 
Support : Creating Website | Johny Template | Mas Template
Copyright © 2011. blognizend - All Rights Reserved
Template Created by Creating Website Published by Mas Template
Proudly powered by Blogger
Google+ Jaime Lacson