Featured Post Today
print this page
Latest Post
Showing posts with label Tutorials. Show all posts

Step by Step Verify your PayPal using Gcash GCash American Express Virtual Pay

PayPal is a service that allows payments and money transfers to be made through the Internet. Transacting parties will not see the other's credit card or bank information. The user has to entrust his card/payment details with PayPal, who in turn keeps this information confidential, allowing the user to transact securely online.

PayPal is not a GCash service. It is its own service, but it accepts GCash American Express Virtual Pay account enrollment.

Verifying your PayPal account means that sending, receiving, and withdrawal limits will be lifted. Now you can send unlimited payments with your Paypal Account.


You just need to provide your PayPal account and the merchant will proceed to deduct it from your GCash AmEx Virtual Pay account. With your account, you can buy products from ebay.com and other international online stores, purchase web domains from GoDaddy, send and receive money from other PayPal users, and even buy in-game credits for your favorite online games.

There are no special requirements for PayPal enrollment. Just make sure you have an active GCash American Express Virtual Pay account.

To access PayPal, simply go to www.paypal.com and start creating your own PayPal account.

To sign-up for a Globe GCash account (if you still don’t have one) which you can easily do through your phone by dialing *143. Another method you can use to register is to download the official GCash app for Android and iPhone.

STEP 1: Log in to your PayPal account. If you don't have a PayPal account yet, create one and register under your real name, your real Philippine residential address, and your active Globe contact number.

STEP 2: Go to "Profile" and then select "Add/Edit Credit Card".


STEP 3: Add your GCash American Express Virtual Pay details.
- Select "American Express" on Card Type.
- Add your GCash AmEx card number and expiration date.

- Add your 4-digit card verification number, also known as CVV or CVC.


STEP 4: At the Billing Address section, select "Enter a new address as billing address" then add your GCash AmEx US address. Leave the Country option as is (Philippines), and click on "Add Card".


STEP 5: Go back to ‘Overview" and then click "Get Verified".
You will be charged USD 1.95 (approximately PHP 87.75 on a USD 1.00 = PHP 45.00 exchange rate for example) for the verification process and will receive an SMS confirmation message. Don't worry, this amount will be refunded later.

A 4-digit verification code will be generated for your account in 2-3 days.

STEP 6: Send an email to gcashinquiries@globe.com.ph with the following format:
Subject: "GCash AMEX – Paypal"
Message: 4-digit PayPal verification code request: (Your registered Globe/TM mobile phone number),
(Your GCash American Virtual Pay card number)

STEP 7: After receiving your 4-digit PayPal verification code, log in again to your PayPal account and click "Get Verified".

A dialog screen will then appear; enter your PayPal code. If it doesn't appear, click on "Enter PayPal Code" right under the Action menu. A congratulatory dialog screen will then appear after a successful code input.


STEP 8: Your GCash American Express Virtual Pay account is now PayPal verified.

With a verified account, you can proceed to transact with all online establishments that support PayPal. You can receive money, and have all account limits lifted. Your verification fee will also be refunded.


Again to verify your account, simply send an email to gcashinquiries@globe.com.ph requesting for your 4-digit code 2-3 days after adding and confirming your GCash American Express Virtual Pay to your PayPal account.


For More Info visit : http://www.globe.com.ph/help/gcash/amex/paypal


0 comments
Posted by: Jaime
blognizend, Updated at: 11:19 AM

How to Make Customize OPENVPN


I want to share to you how to make a customize Open VPN with custom splash and installer itself. I put Everything you need here.

OpenVPN is a full-featured SSL VPN which implements OSI layer 2 or 3 secure network extension using the industry standard SSL/TLS protocol, supports flexible client authentication methods based on certificates, smart cards, and/or username/password credentials, and allows user or group-specific access control policies using firewall rules applied to the VPN virtual interface. OpenVPN is not a web application proxy and does not operate through a web browser.
OpenVPN 2.0 expands on the capabilities of OpenVPN 1.x by offering a scalable client/server mode, allowing multiple clients to connect to a single OpenVPN server process over a single TCP or UDP port.
This document provides step-by-step instructions for configuring an OpenVPN 2.0 client/server VPN, including:


Click this for more info


1. Download and install Open VPN setup.


2.After installing OPENVPN Install the NSIS+plugins located on customize openvpn SS folder.
 3.OPEN the folder OpenVPNPortableSF here you can find editable file. You can make or search on Google for ICON  format. Make sure you have the same NAME including the script or else there will be an error on compiler.
ICON Tools:
If you Want to Change ICON
If you want to EDIT

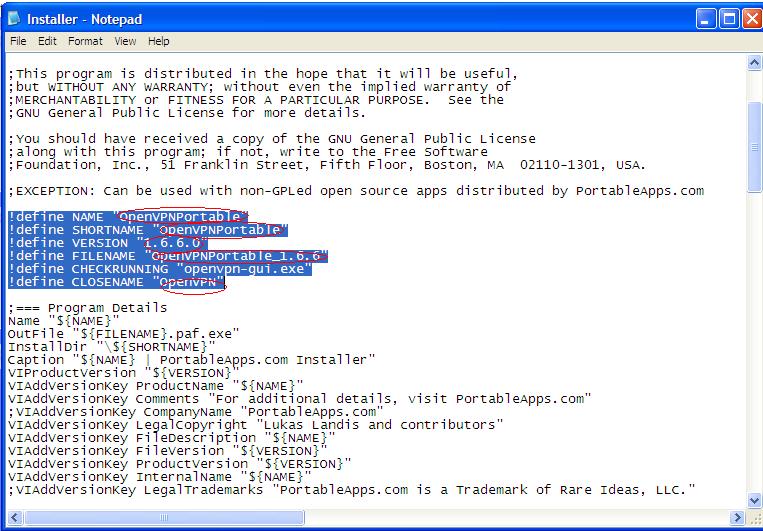
Update: Here is my sample you can change.To edit Script used ctrl+f and find keyword OpenVPNPortable

OpenVPNPortable NSIS Header Script  EDIT here.


OpenVPNPortable NSIS Script EDIT here


Installer script EDIT Here.


READ MORE....


1 comments
Posted by: Jaime
blognizend, Updated at: 9:15 AM

Unlocking Huawei B933/B200/B200W

Guides on Unlocking Huawei B933/B200/B200W

This is to used other SIM and net provider.

1.Unzip the Unlocker
2.Disable the anti_virus software
3.Open the DC-Unlocker Portable folder,run dc-unlockerclient2
Note:Win7-run as administrator


4.0pen rPE folder, run rPE
Note:Win7-run as administrator
5.Connect Huawei B-series Modem without sim via rj45 through lan card of pc
6.On rPE click Select Process>Open Process>dc-unlocker2


7.Click Start Tab on rPE,
8.Click the Magnifying glass tab at dc unlocker


9.Go back to rPE, click Stop Tab

10.Click Packet 13 for B200/B200W and Packet 16 for B933 and get the 8 digit code
Ex. Unlock code for B200W:25165267


11.Open Internet explorer, 
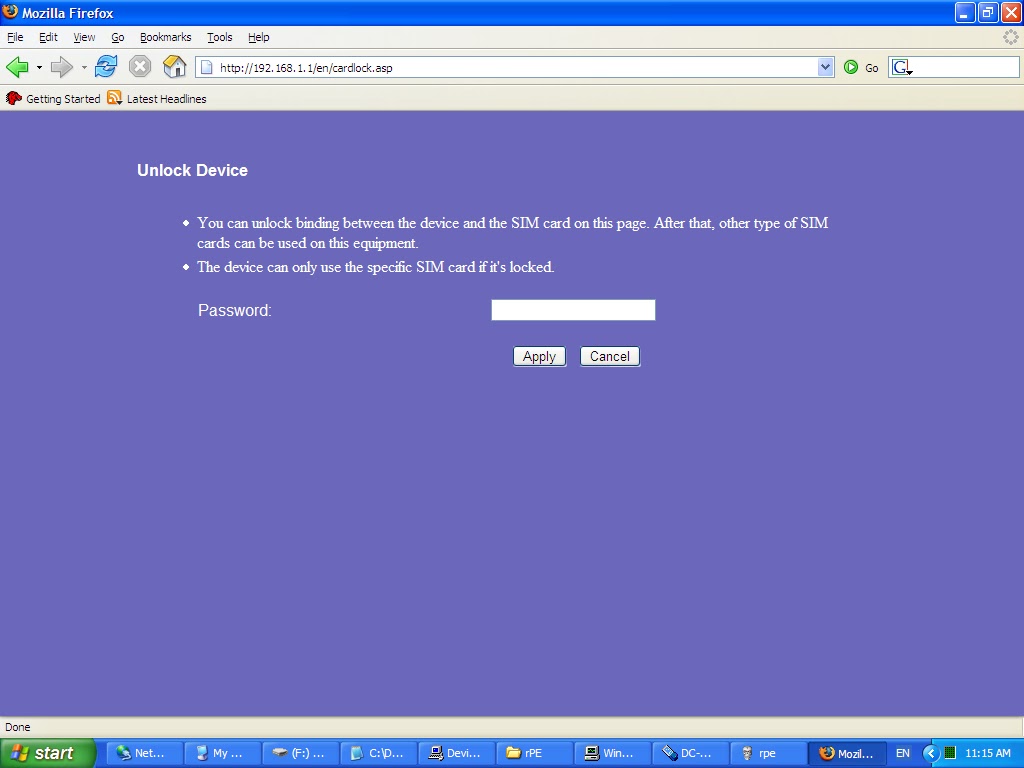
type 192.168.1.1/en/cardlock.asp

username:admin /password:gtadmin  put the 8 digit code, then apply, unlocking is done. 'CREDIT TO SYM'


12. To access the admin setting or  how to change WiFi Password for B200w.


Visit http://blogmytuts.blogspot.com/2012/11/how-to-change-wifi-password-on-huawei.html
  Type this on your Browser  for Globe User  (on original huawei firmware admin:admin)

192.168.1.1/globe

.. it will prompt you for password..


username: admin
password: gtadmin


Skip Ads in 5 Sec.
4 comments
Posted by: Jaime
blognizend, Updated at: 9:09 AM

How to Change WiFi Password on HUAWEI B200/B933/B200W

How to Change WiFi Password on HUAWEI B200/B933/B200W


I seen a lot globe user searching how to access admin setting on their Huawei B series modem and how to change WiFi password step by step.

1.Type this on your Browser  for Globe User
192.168.1.1/globe

.. it will prompt you for password..


username: admin
password: gtadmin
 
(on original huawei firmware admin:admin)
 
2. Click Advance Setting


 3. Click WLAN Basic Settings


4. Change SSID or your Wireless Network name, then Click apply


 5.Go back to Advance Settings click WLAN Advance Setting.


 6. Change your WiFi Password here your desired Encryption mode, then click apply

5 comments
Posted by: Jaime
blognizend, Updated at: 9:04 AM

Activate and Installing Windows 8

WINDOWS 8

1.a] Burn "
WINDOWS 8.iso" at least possible speed (4x)
USB Bootable: http://blogmytuts.blogspot.com/2011/10/create-bootable-usb-drive.html

1.b] As the ISO is bootable, you can boot through the DVD/USB(for tutorial on how to install W8 using USB check the provided link above) and start installing W8

1.c] Once the installation started, choose your version of W8 and finish the instalation


OPTIONS TO ACTIVATE WINDOWS 8
ACTIVATING WINDOWS PERMANENTLY

2.a] Download and execute "K.J_121103.exe" as ADMIN

2.b] click ENGLISH for english language, wait til the activation process may take couple of minutes, after that you must see
Activation Sucessfull message on screen, which will lead you to restart.


Note : This activator must activate your windows Permanently and enable Personlization settings. If it falied to Enable Personlization Settings
Please follow the below instructions


HOW ENABLE PERSONALIZATION SETTINGS (YOU SHOULD ACTIVATE WUNDOWS 8 FIRST BEFORE FOLLOWING THIS STEPS (2.a) FIRST)

These instructions are ONLY for those who are not able to access the personlization settings after Activating Windows Peminently.

3.a] RUN "FIX_P8.25.exe" as ADMIN

3.b] Windows CMD will automatically Run fix and restart your PC

After restart, you should be able to Access Personlization settings

Enjoy !!
NOTE: always RUN AS ADMIN when using the activator


Download Windows 8


Proof Of the permanent Activator Windows 8 AIO 72 Final Build 9200 Multi6 + Permanent Activator
No WATERMARK (CLICK ON THE IMAGE TO SHOW IN FULLSCREEN)
Windows 8 AIO 72 Final Build 9200 Multi6 + Permanent Activator
PC Settings
Windows 8 AIO 72 Final Build 9200 Multi6 + Permanent Activator
PERMANENT AVTIVATOR (The screenshot snapped from win pro but don't worry about that they're the same)


Windows 8 AIO 72 Final Build 9200 Multi6 + Permanent Activator  

Activator:


Windows 8 PERMANENT ACTIVATOR (credit to massam)
http://adf.ly/EOJJS
DL via Google Docs   
Note: Skip Ads  on upper right Side
1 comments
Posted by: Jaime
blognizend, Updated at: 11:57 PM

Wimax VIP MAC HUNT

For VIP Mac hunter this trick  might help you..

Default Domain Is @globelines.com.ph 

Vip Mac = @globetel.com.ph
  

Wee are Looking for NAIglobetel.com.ph  or other NAI domain

1.Tools you need..Wimax Scavenger  or Wimax Tools by Cherles
You can find them here just search.


2.Scan  LIVE IP

3.Open Browser  TYPE the IP you have Scan..

4.LOG IN as use: user 

5. Click Check


If you don't find the CHECK in the GUI  add html/management/check.asp on IP
Example:
http://10.39.29.24/html/management/check.asp


 Sometime you get lucky finding this with user I and password.


 Use the VIP   MAC log in as admin 


- Gui Settings  change this in security
- Nai Domain > globetel.com.ph  
- User Id Domain > globetel.com.ph

 GOOD LUCK!!

NOTE: It defends on LOCATION "VIP MAC" are usually  for company or corporate used. If your in a City you can find them.


You might also  check this tuts : http://www.symbianize.com/showthread.php?t=846259
12 comments
Posted by: Jaime
blognizend, Updated at: 9:45 PM

How to restore windows 7


A very valuable utility when you're trying to solve a major problem windows system restore.
A current copy of files and other important files in Windows 7 are saved and can be restored using System Restore.


Follow these steps for reverting important Windows 7 system files back to a previous state using System Restore:

1.Navigate to the Start -> All Programs -> Accessories -> System Tools program group.

    Click on the System Restore program icon.


  2  Click Next > on the Restore system files and settings window.


0 comments
Posted by: Jaime
blognizend, Updated at: 1:39 AM

How to create windows 7 image backup

Windows 7 backup utilities are actually pretty impressive and creating an image will be possible in all versions. Today we take a look at creating a backup image of your machine without the need for a third party utility like Norton Ghost or True Image that are usually used in computer shop.

 Technician like me used this tools to install a fresh image to other PC. This is more faster than performing a REFORMAT a crush Windows .

You just just finished installing a fresh copy of Windows 7 on your computer and have it set up to your liking. One of the first things you should do now is create an image of the disc so in the event of a crash you will be able to restore it to its current state. An image is an exact copy of everything on the drive and will restore it back to its current state. It’s probably best to create an image when everything is clean and organized on your system. This will make the image file smaller and allows you to restore the system with a smooth running set up.


 Creating an Image in Windows 7 CLICK HERE


0 comments
Posted by: Jaime
blognizend, Updated at: 1:17 AM

How to Fix Laptop (Basic)

Is your laptop didn't Boot Up!NO Screen? I teach you how to fix it before you call a expensive Tech guy.
Common problem of laptops when you switch it on LED light turns on, but "no screen"  or LED lights ON then turn OFF.


 Tutorial by Blogmytuts 101:


READ MORE .....


0 comments
Posted by: Jaime
blognizend, Updated at: 11:12 PM

CD -RKing CC Series CW-8196 WiFi Router Setup for Wimax BM622

CD  -RKing CC Series  CW-8196 WiFi Router Setup for  Wimax BM622

 This is a tutorials for networking .Static Setting for old Wimax BM622 for CD - Rking CW-8196


Price of the router is only P780.00


1.Type the IP 192.168.10.1 on your browser and log-in   admin:admin


0 comments
Posted by: Jaime
blognizend, Updated at: 10:56 PM
 
Support : Creating Website | Johny Template | Mas Template
Copyright © 2011. blognizend - All Rights Reserved
Template Created by Creating Website Published by Mas Template
Proudly powered by Blogger
Google+ Jaime Lacson